


The Method:
The main aim of this strategy is to allow the user to use
1 min strategy price chart and enter at predefined areas determined
when the trader starts his/her day of trading on different
currency pairs.
This 1 min strategy ASR strategy (ASR-Attacking Support and
Resistance) has the advantaged that those areas will be
known beforehand and is only entered when the specific area
are approached and the setup criteria is met.
The amount of pips obtainable with the ASR are in the region
of 10-100pips depending on the strength of the move
especially when it is news driven. The trader will also know when to close the trade.
This also fits nice into the MLTS as discussed up to now. If
you have missed a trade in the MLTS you can always
captures some pips as the price moves towards the Profit
Target using the1 min strategy to attack that level. The main thing to
take into account is that the Risk:Reward must never be less
then 1:1. As long as that ratio is maintained you will make
money.
Never use more then 1,5% of your capital as
risk with the 1 min strategy ASR strategy until you are
comfortable trading it.This 1min strategy also satisfy the need for trading. We are human and
when we sit to trade we want to trade. Patience is one of the destroyers of an
account. We don’t want to wait so we look for trades and get burned more
then often. This 1 min strategy gives us the opportunity to satisfy that
need while our risk remains small enough not to get wiped out.
This strategy is exactly what the title is saying. It is all about
determining some support and resistance levels and then to attack
those levels. It differs in the sense that we are not going to trade off
the support and the resistance but rather towards them.
That means that we are going to determine before the day
starts where support and resistance is likely going to occur. Then we mark a
price range 30-50 pips away from the support/resistance.
What we are then looking for is for the price to move into that price range
and then we look at the 1 min strategy chart to enter at a certain setup we will discuss
later on. We then stay in the trade and exit the trade according to the rules as
explained later.
We are going to use a 4hour chart to determine the support
and resistance levels that might be tested and then mark our areas,
then change to the 1 min strategy chart and WAIT for action.
All indicators used is standard indicators found in most
software used for trading Forex. We can make use of an alert setup
to warn us when the price is nearing the marked area so we don’t
have to be in front of the computer all the time. We can be in the
vicinity doing other things and only draw closer when the alert goes
off. We then watch for the setup and finish the trade according to the rules.
We also don’t want to overtrade by watching to many pairs and
entering to many trades. I have only used the EurUsd and the
GbpUsd and I will decide on one of the two when the trading area is approach.
Sometimes the EurUsd will be there first and sometimes the GbpUsd first. I
have tried to only trade 3 trades per day.
You as a trader may test this on any pairs you would like to trade as the
support and resistance levels works the same for all pairs.
The INGREDIENTS:
On a 4H chart plot the following Moving Averages
1. 200 simple moving average
2. 89 simple moving average
3. 21 exponential moving average
On a 1 min strategy Chart plot a 34 simple moving average

If you haven’t watch the video yet please do so now before going
further.
Please copy this link to your browser to play back your recording:
http://www.gatherplace.net/play?25198708
Recording Name: 4Hour Rhythm
THE METHOD:
Now for the method to determine the support/resistance we
must understand the role the 3 moving averages are playing in the
4Hour timeframe. You will find that the price is finding support and or
resistance on and against these moving averages quite amazingly.
Lets look at some examples of it.

If you look at the chart you will notice how many times have the price
moved towards those moving averages. This is where the key to this
strategy is nested. Because the price is going to those moving
averages very often we can mark a price area 30-50pips away from
those moving averages and then use the 1 min strategy to enter a trade with
our initial profit goal round about the moving average. At this stage I only
want you to see the potential of the price moving towards those
moving averages as I have not marked everyone on the chart included.
The idea was not to show every move towards
support/resistance in the examples but rather to gave you the idea of
the concept.
Lets do some more examples
Example 1:
Here you can see that the price is moving towards the moving averages
quite often in a span of 4 weeks. That creates opportunities for trading
using the 1 min strategy ASR strategy

Example 2:
Here is a video link to the 1 min strategy ASR strategy that you can watch
Please copy this link to your browser to play back your recording:
http://www.gatherplace.net/play?47083658
Recording Name: 1Min ComboBox

A. The downtrendline was broken and the odds were good for
the price to move towards the 21ema creating an opportunity
for a long trade
B. When the price reached an area with the price rising just
below the 21ema the signal candle as well as the previous red
candle had tails on them creating a possibility of a retest of the
21ema. An area of 30-50 pips could be marked for a possible
trade.
C. The price formed an inverted red hammer and when the price
moved above the high of that hammer (brown horizontal line)
the odds were high that the price might move up to the 21ema
once again creating an opportunity to trade.
D. After a huge bullish candle the odds were high that the 89sma
might be tested creating yet another opportunity to trade.
E. With the price moving above the 89sma we know that the
price very often comes back to retest the 89sma and when that
tail was busy forming the odds were good that the 89sma
might be tested creating 1 min strategy ASR trade opportunity.
F. Here we had a doji candle as well as a shooting star
indicating a possible downmove which creates ones again an
opportunity for an ASR trade down to the 89sma.
By now you must have grasped what there is to look for when
using the moving averages as support and resistance and the
marking of the areas.
It is very important also to recognize the candle emotion prior to
the signal candle like hammers, morning/evening stars,
shooting stars, bullish/bearish engulfing etc. to determine the
intension of the move to go the way as anticipated.
Sometimes there are barriers for the price to overcome to be able to
reach the desired moving average as anticipated. And they are equal
price levels like 1,3500--1.2900—1.4000 etc. They play a major role as
the price will try to find support and or resistance at those levels as
well. When these price levels are in the way to a moving average the
trader must take that into account that the price might turn around at
those levels or stay there for some time before getting direction again.
Therefore when in a trade then take caution by either securing a non
loss situation by moving the position to breakeven or move the
stoploss to a profit exit at least should the price turn around.
Another barrier are trendlines. Trendlines of supp/res in the way to a
moving average must also be taken into account. Those trendlines
also act as possible profit taking zones. Trendlines is also
oppertunities for some ASR trades.

trades. Points 1 to 5 is necessary for the trendlines to be defined and
cannot act as possible areas.
See if you can spot some other areas around the different moving
averages as discussed previously on this same chart and see for
yourself how many opportunities does occur and if traded how many
trades can be made.

what happens on the 1 min strategy chart at those levels.

levels before getting direction. Thos red marked areas
But here we have another opportunity coming our way and that is if the
price have a high probability to move to the 4Hour 200sma and
there are some price levels in between we can marked those areas
just as the chart below indicates giving us another 1 min strategy ASR
entries.

down to the 200sma on the 4Hour
crossing 3 price levels each one
creating an opportunity to have a
1 min strategy ASR trade. The last 30-50
pips approaching the price level
are ideal to have an area marked
as indicated on the 1min chart
giving as ASR trade
opportunities.
At area marked B you can see how the price is interacting at the price
levels before getting direction. That red marked area

But now we come to the meat of the 1Min Attacking Support and
Resistance levels and that is the Entry, Stoploss and Exit rules.
Entry, Stoploss and Takeprofit:
The entry is based upon an old entry method called the 123 method.
When the price are at the marked area we start to look for a 123 setup to
form and enter the trade on that bases.
As you can see on the chart below that in a 123 setup point no 3 must be
lower then point 1 for a short trade and the price have to surpass point
2 for point 3 to be formed. Entry is made when the 1 min candle closes
below point 2. Take profit depends on the speed of the market but the
34sma acts as a very good place to close the trade should it being
breached.

success of the method is the determination of the areas and needs
some practice.
The entry, exit and profit taking setups for a long entry is just the inverse
of what is described on previous page.
We will now move to some examples of trades and areas marked.
In the example below the anticipation was for the price to bounce off the
bottom trendline and to go to the 21ema on the 4Hour. That area is
then marked on the 1Min chart as indicated on the right hand chart
and entry was made according to our 123 method and take profit was
when the price crosses below the 34simple moving average.


Some more examples of entry, stoploss and exit trades.

 The following few pages will show some areas marked as described
combining moving averages, trendlines and price levels.


As you can see that by premarking the trade opportunity areas there is
plenty trades to be made on a weekly basis.
This 1min strategy also satisfy the need for trading. We are human and
when we sit to trade we want to trade. Patience is one of the
destroyers of an account. We don’t want to wait so we look for trades
and get burned more then often. This 1min ASR strategy gives us the
opportunity to satisfy that need while our risk remains small enough.
Now that you have worked through this you can see how this method can
also be used to Premark the areas using the Fib retracements and or
extensions on the 4Hour and even Daily charts as discussed on the
MLTS. There are plenty of opportunities to trade this method.
READ MORE - 1min strategy Attacking Support and Resistance
The main aim of this strategy is to allow the user to use
1 min strategy price chart and enter at predefined areas determined
when the trader starts his/her day of trading on different
currency pairs.
This 1 min strategy ASR strategy (ASR-Attacking Support and
Resistance) has the advantaged that those areas will be
known beforehand and is only entered when the specific area
are approached and the setup criteria is met.
The amount of pips obtainable with the ASR are in the region
of 10-100pips depending on the strength of the move
especially when it is news driven. The trader will also know when to close the trade.
This also fits nice into the MLTS as discussed up to now. If
you have missed a trade in the MLTS you can always
captures some pips as the price moves towards the Profit
Target using the1 min strategy to attack that level. The main thing to
take into account is that the Risk:Reward must never be less
then 1:1. As long as that ratio is maintained you will make
money.
Never use more then 1,5% of your capital as
risk with the 1 min strategy ASR strategy until you are
comfortable trading it.This 1min strategy also satisfy the need for trading. We are human and
when we sit to trade we want to trade. Patience is one of the destroyers of an
account. We don’t want to wait so we look for trades and get burned more
then often. This 1 min strategy gives us the opportunity to satisfy that
need while our risk remains small enough not to get wiped out.
This strategy is exactly what the title is saying. It is all about
determining some support and resistance levels and then to attack
those levels. It differs in the sense that we are not going to trade off
the support and the resistance but rather towards them.
That means that we are going to determine before the day
starts where support and resistance is likely going to occur. Then we mark a
price range 30-50 pips away from the support/resistance.
What we are then looking for is for the price to move into that price range
and then we look at the 1 min strategy chart to enter at a certain setup we will discuss
later on. We then stay in the trade and exit the trade according to the rules as
explained later.
We are going to use a 4hour chart to determine the support
and resistance levels that might be tested and then mark our areas,
then change to the 1 min strategy chart and WAIT for action.
All indicators used is standard indicators found in most
software used for trading Forex. We can make use of an alert setup
to warn us when the price is nearing the marked area so we don’t
have to be in front of the computer all the time. We can be in the
vicinity doing other things and only draw closer when the alert goes
off. We then watch for the setup and finish the trade according to the rules.
We also don’t want to overtrade by watching to many pairs and
entering to many trades. I have only used the EurUsd and the
GbpUsd and I will decide on one of the two when the trading area is approach.
Sometimes the EurUsd will be there first and sometimes the GbpUsd first. I
have tried to only trade 3 trades per day.
You as a trader may test this on any pairs you would like to trade as the
support and resistance levels works the same for all pairs.
The INGREDIENTS:
On a 4H chart plot the following Moving Averages
1. 200 simple moving average
2. 89 simple moving average
3. 21 exponential moving average
On a 1 min strategy Chart plot a 34 simple moving average

If you haven’t watch the video yet please do so now before going
further.
Please copy this link to your browser to play back your recording:
http://www.gatherplace.net/play?25198708
Recording Name: 4Hour Rhythm
THE METHOD:
Now for the method to determine the support/resistance we
must understand the role the 3 moving averages are playing in the
4Hour timeframe. You will find that the price is finding support and or
resistance on and against these moving averages quite amazingly.
Lets look at some examples of it.

If you look at the chart you will notice how many times have the price
moved towards those moving averages. This is where the key to this
strategy is nested. Because the price is going to those moving
averages very often we can mark a price area 30-50pips away from
those moving averages and then use the 1 min strategy to enter a trade with
our initial profit goal round about the moving average. At this stage I only
want you to see the potential of the price moving towards those
moving averages as I have not marked everyone on the chart included.
The idea was not to show every move towards
support/resistance in the examples but rather to gave you the idea of
the concept.
Lets do some more examples
Example 1:
Here you can see that the price is moving towards the moving averages
quite often in a span of 4 weeks. That creates opportunities for trading
using the 1 min strategy ASR strategy

Example 2:
Here is a video link to the 1 min strategy ASR strategy that you can watch
Please copy this link to your browser to play back your recording:
http://www.gatherplace.net/play?47083658
Recording Name: 1Min ComboBox

Lets look at areas marked A – F individually.
A. The downtrendline was broken and the odds were good for
the price to move towards the 21ema creating an opportunity
for a long trade
B. When the price reached an area with the price rising just
below the 21ema the signal candle as well as the previous red
candle had tails on them creating a possibility of a retest of the
21ema. An area of 30-50 pips could be marked for a possible
trade.
C. The price formed an inverted red hammer and when the price
moved above the high of that hammer (brown horizontal line)
the odds were high that the price might move up to the 21ema
once again creating an opportunity to trade.
D. After a huge bullish candle the odds were high that the 89sma
might be tested creating yet another opportunity to trade.
E. With the price moving above the 89sma we know that the
price very often comes back to retest the 89sma and when that
tail was busy forming the odds were good that the 89sma
might be tested creating 1 min strategy ASR trade opportunity.
F. Here we had a doji candle as well as a shooting star
indicating a possible downmove which creates ones again an
opportunity for an ASR trade down to the 89sma.
By now you must have grasped what there is to look for when
using the moving averages as support and resistance and the
marking of the areas.
It is very important also to recognize the candle emotion prior to
the signal candle like hammers, morning/evening stars,
shooting stars, bullish/bearish engulfing etc. to determine the
intension of the move to go the way as anticipated.
Sometimes there are barriers for the price to overcome to be able to
reach the desired moving average as anticipated. And they are equal
price levels like 1,3500--1.2900—1.4000 etc. They play a major role as
the price will try to find support and or resistance at those levels as
well. When these price levels are in the way to a moving average the
trader must take that into account that the price might turn around at
those levels or stay there for some time before getting direction again.
Therefore when in a trade then take caution by either securing a non
loss situation by moving the position to breakeven or move the
stoploss to a profit exit at least should the price turn around.
Another barrier are trendlines. Trendlines of supp/res in the way to a
moving average must also be taken into account. Those trendlines
also act as possible profit taking zones. Trendlines is also
oppertunities for some ASR trades.

Look how trendlines can be used to marked areas for possible ASR
trades. Points 1 to 5 is necessary for the trendlines to be defined and
cannot act as possible areas.
See if you can spot some other areas around the different moving
averages as discussed previously on this same chart and see for
yourself how many opportunities does occur and if traded how many
trades can be made.

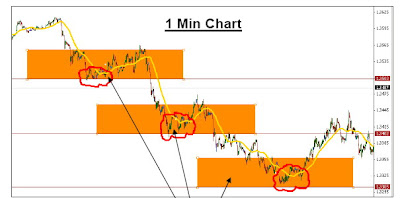
In the next chart the areas was marked and we will look in more depth
what happens on the 1 min strategy chart at those levels.

At area marked A you can see how the price is interacting at the price
levels before getting direction. Thos red marked areas
But here we have another opportunity coming our way and that is if the
price have a high probability to move to the 4Hour 200sma and
there are some price levels in between we can marked those areas
just as the chart below indicates giving us another 1 min strategy ASR
entries.


4 Hour Chart As you can see that the price went
down to the 200sma on the 4Hour
crossing 3 price levels each one
creating an opportunity to have a
1 min strategy ASR trade. The last 30-50
pips approaching the price level
are ideal to have an area marked
as indicated on the 1min chart
giving as ASR trade
opportunities.
At area marked B you can see how the price is interacting at the price
levels before getting direction. That red marked area

A lot of pages just to get the concept of the areas under the belt.
But now we come to the meat of the 1Min Attacking Support and
Resistance levels and that is the Entry, Stoploss and Exit rules.
Entry, Stoploss and Takeprofit:
The entry is based upon an old entry method called the 123 method.
When the price are at the marked area we start to look for a 123 setup to
form and enter the trade on that bases.
As you can see on the chart below that in a 123 setup point no 3 must be
lower then point 1 for a short trade and the price have to surpass point
2 for point 3 to be formed. Entry is made when the 1 min candle closes
below point 2. Take profit depends on the speed of the market but the
34sma acts as a very good place to close the trade should it being
breached.

Price have to surpass point 2 for point 3 to be formed
Quite surprised that the meat of the system is merely one page. The whole
success of the method is the determination of the areas and needs
some practice.
The entry, exit and profit taking setups for a long entry is just the inverse
of what is described on previous page.
We will now move to some examples of trades and areas marked.
In the example below the anticipation was for the price to bounce off the
bottom trendline and to go to the 21ema on the 4Hour. That area is
then marked on the 1Min chart as indicated on the right hand chart
and entry was made according to our 123 method and take profit was
when the price crosses below the 34simple moving average.


Some more examples of entry, stoploss and exit trades.


combining moving averages, trendlines and price levels.


Conclusion:
As you can see that by premarking the trade opportunity areas there is
plenty trades to be made on a weekly basis.
This 1min strategy also satisfy the need for trading. We are human and
when we sit to trade we want to trade. Patience is one of the
destroyers of an account. We don’t want to wait so we look for trades
and get burned more then often. This 1min ASR strategy gives us the
opportunity to satisfy that need while our risk remains small enough.
Now that you have worked through this you can see how this method can
also be used to Premark the areas using the Fib retracements and or
extensions on the 4Hour and even Daily charts as discussed on the
MLTS. There are plenty of opportunities to trade this method.